Dismantable 3-El.-Yagi for the bands 10-17m
This article
was published by DK7ZB in " funk 3/2001", S. 41-43
|

|
During
DXpeditions to OH0, EA9, IS0 and TK I
have used some types of lightweight-Yagis. The one with the best
compromise will be described here. Picture 1 shows the Yagi 12 m high on a
homemade pole. On 12 m I worked a pile-up of JA-stations.
The basis of the construction
are constant lengths of the middle, tapered tubes. The outer parts are
adjustable for each band. The distances between Reflector-Radiator and
Radiator-Director are the same on all bands from 10 to 17 m. When changing
the band you only have to adjust the element-lengths.
The construction details are
aquired with the PC-program "YA" [1]. On all bands the feedpoint
impedance is 50 Ohms. Without the aid of the program this could not been
carried out so far. How to use the program I described in [2].
The gain of real 4,8 dBd seems
to be low, but you get some advantages with this compromise. Commercial
gains for antennas mostly are to high, please keep that in mind! The
bandwidth is high, you can mount this Yagi 6m high and up without detuning
effects. If you use the exact dimensions, you will get a well performing
antenna.
|
|
Table 1: The
given details mean that the Yagi is tuned in the middle section of each band at
SWR 1,0 (10 m at 28,5 MHz)
|
Band |
Gain |
Front/Back |
SWR |
| 10m |
4,8dBd |
13dB |
<1,6 |
| 12m |
4,8dBd |
17db |
<1,1 |
| 15m |
4,9dBd |
12dB |
<1,2 |
| 17m |
4,8dBd |
13dB |
<1,1 |
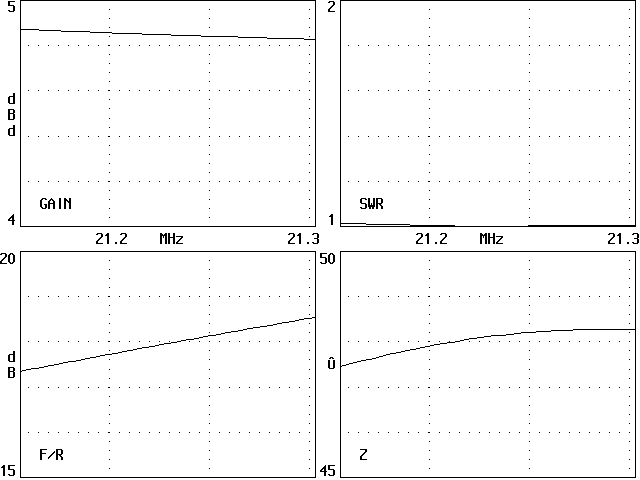
Vicarious for all bands I have plotted the
important diagrams for the 15m-band, which is very broad. Gain, SWR, Front/Back
and Impedance for the full 450 KHz are seen in picture 2. Remarkable is
the low SWR. Picture 3 shows the horizontal pattern.
Picture 2:

Picture 3: Horizontal pattern in the 15m-Band at 21,2MHz
for example, similiar on the other bands

Mechanical
details for the boom and the elements
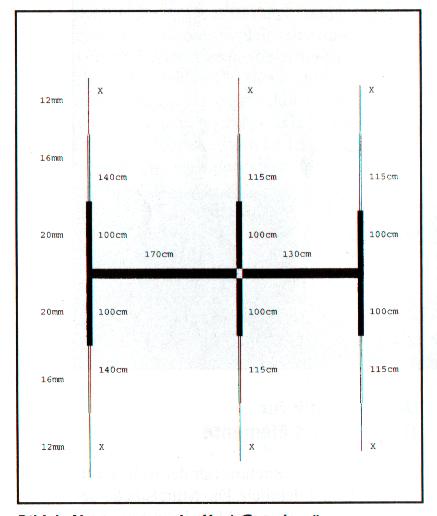
You see the lengths and the
diameter of the tubes in picture 4. The middle parts consist of 2 m long
20x1,5 mm aluminium (one part). The radiator has two parts of 1m length.
The ends must be slotted and are fixed with clamps (picture 5). All tubes
are listed in table 2
The outer parts (12 mm tubes)
must be pulled out or pushed in for changing the band. This is done in
some minutes. It is easier if you mark the lengths of table 2 with
coloured rings for each band.The boom consists of 40x2 mm aluminium, the
elements are fixed with automotive clamps (picture 6). For better
stability you can mount the middle parts with a short piece of 25x2mm
tube.
Picture 4: Lengths of the
aluminium-tubes
|

|
Table 2: Needed aluminium tubes
| Dimension |
Pieces |
Length |
Function |
Details |
| 40x2mm |
1 |
3,0m |
Boom |
- |
| 20x1,5mm |
2 |
2,0m |
Middle piece Ref, Dir |
- |
| 20x1,5mm |
2 |
1,0m |
Middle piece Radiator |
middle part isolated for
feeding |
| 16x1,5mm |
2 |
1,60m |
Intermediate pieces Ref |
20cm pushed in 20mm-tube |
| 16x1,5mm |
4 |
1,35m |
Intermediate pieces Rad, Ref |
20cm pushed in 20mm-tube |
| 12x1,0mm |
2 |
2,00m |
Ends Ref |
Lengths table 2 |
| 12x1,0mm |
2 |
2,10m |
Ends Rad |
Lengths table 2 |
| 12x1,0mm |
2 |
1,80m |
Ends Dir |
Lengths table 2 |
Table 3: Lenghts of the outer pieces (12mm-Alu), free ends
| |
10m |
12m |
15m |
17m |
| Reflector |
26cm |
70cm |
120,5cm |
182,5 |
| Radiator |
39cm |
82cm |
135cm |
193,5 |
| Director |
5cm |
54cm |
106,5cm |
163,5cm |
|

|
For mounting and dismounting
you need a 13mm-wrench for all nuts and a screwdriver for the clamps. All
parts dismounted are very handy and can be carried on the roof of a car or
a motorcaravan.
Together with a 12m-pole I had
this yagi with me on some DXpeditions to OH0, TK and IS0 (see picture 1).
Picture 5
|
|
Picture 6: Element mounting
for Reflector und Director
|
 |
|

|
Picture 7: Middle part of the radiator
Pictures explain more than
many words, therefore we take a look on picture 7. The two middle parts
(distance about 20mm) of the radiator are mounted with an isolated tube of
hard-PVC or other material. Fixing on the boom is made with aluminium
squares and automotive clamps. |
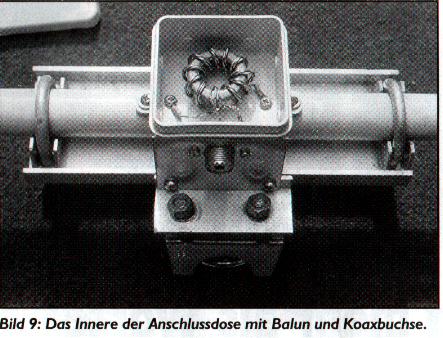
A small box with a SO-239 coax-socket contains the toroid balun 1:1 with a
trifilar wounding. Up to 300 watts use an Amidon T130-6, at higher power up to
1KW an Amidon T200-6. It is possible to "stack" two cheap toroids for
500 watts with tape. The
schematic of the balun is shown in picture 8. 3x10 wounds of
1,2mm-enamelled copperwire.The three wires must be drilled and wired as
shown in picture 9.
|
 |
|

Picture
9: The box with balun and coax-socket |

Picture 10: Homemade telescopic pole for portable operation
|
Literature and sources:
[1] Program YA, ARRL-Antenna-Handbook
[2] Steyer, M. (DK7ZB): Das Konstruieren von Yagi-Antennen mit dem Programm YA
von K6STI, funk 11/99, S.66
[3] Steyer, M. (DK7ZB): Selbstbau-Yagis für das 10m-Band,
funk 1/97, S. 36


